Buttons
In this section, you'll learn how to use the button components.
Button Style
Buttons can have different styles (background colors).
Here, are all possible values for style function argument.
- primary
- secondary
- success
- danger
- link
📝 If
linkstyle is used, the button won't send any interactions!
Style examples

The image was taken from Discord Docs
Button types
There are 2 types of buttons : interactive and link.
When an interactive button is pressed, it sends an interaction which can be used together with $onInteraction[ID].
Every interactive button has an ID. If you create $onInteraction[ID] callback, it will get triggered when the button with the same ID is pressed.
Interactive buttons can use every style except link.
Link buttons don't send any interactions. When they're pressed they forward the user to a website.
Link buttons have to set their style argument value to link.
Adding a button
Buttons can be added to a new message or already existing message.
$addButton[New row;Button ID/URL;Label;Style;(Disabled;Emoji;Message ID)]
Function arguments breakdown
-
new row- If set toyesthe button will appear in a new row. If it's set tonothe button will appear in the same row as a previous button. Check examples below.📝 A message can have a maximum of 25 buttons (5 rows of 5 buttons).
-
button ID/url- Depending on a button type, you either set it tointeractionIDwhich is then used in$onInteraction[ID]callback orURLif it's link button. -
label- It's the text value visible on a button -
style- It's used to specify the button's background color. If the button has a link/url you have to set this tolink. Check this section for more details. -
disabled- If set toyesthe button can't be pressed. Defaults asno. (Optional) -
emoji- Adds an emoji inside the button. Emojis have to be either pasted as unicode or be in this format<:emoji name:emoji ID>. (Optional) -
message ID- Adds a button to the provided message ID. It's important to note that provided message ID author has to be the bot. (Optional)
Note: Interactive buttons can't have duplicated
ID's in the same message. So for example, you can't have two buttons with the ID set totest
Note: Ifurlis used ininteraction ID or urlargument, it has to start withhttp://orhttps://
Editing a button
$editButton[Button ID/URL;Label;Style;(Disabled;Emoji;Message ID)]
Arguments work exactly the same way as in $addButton function. Button ID/URL is used for finding the button.
Removing buttons
Removing button from a message can be done using these three functions :
Examples
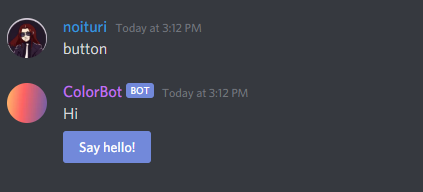
Creating a simple interactive button

Note: The last argument in
$addButtonis empty because we don't want emojis for this example
Creating $onInteraction[] callback

Note: ID provided in
$onInteraction[]is the same as the one provided in$addButton[]from this section
Note: In$addButton[],yesis being used for thenew rowargument so that the button would appear in the next row. Check the output below.
Output
Command execution
After pressing the button
